Nitpick is a distributed issue tracker which keeps the issues alongside the code in the project version control system. Similar to traditional centralized issue or bug trackers you can create issues, comment on issues, change various bits of metadata about issues and add attachments to issues. Unlike traditional issue trackers there is no central web server you have to access. Instead the issue database lives beside the source code inside the same version control system.
Having the issue database beside the code provides several advantages over traditional issue trackers. The first of these is that no matter where the developer is they can view, modify and create issues. There is no central web server which requires Internet to access. For projects which use a DVCS like git or Mercurial, the advantages of having the issues beside the project are similar to the advantages of using those systems over a centralized VCS. These include disconnected operation and increased redundancy of the issue database, there is no central point of failure.
One big feature of storing the issue database beside the code in a VCS is that when you branch the code you are also branching the issue database. If you create a branch to solve some particular issue then inside that branch you can create comments against that issue to document various decisions. Within that same branch you would mark the issue as closed and when that branch was merged back into the mainline the issue database there will automatically be updated with the new issue status.
Conversely, if a new long lived branch is created then new issues can be created against only that branch. There is no guessing which branch an issue corresponds to because the current issue database always refers to the current branch. Nitpick also supports combining multiple Nitpick repositories across multiple branches to provide a complete view to the developer. For more about this advanced feature see Foreign Projects below.
You can get Nitpick in one of three ways. The first is to clone the git repository git clone https://github.com/travisb-ca/nitpick.git. The second is to download the latest release from this link. The third is to download the bleeding edge version of Nitpick directly.
Should this manual not have some information you need or you want to discuss some other aspect of Nitpick you can get help on the mailing list. Subscription and archives are available at http://lists.travisbrown.ca/listinfo.cgi/nitpick-travisbrown.ca.
Nitpick is a self contained system written in Python. All that it requires is a complete standard installation of Python 2.7. No additional Python libraries are required. Nitpick also requires the standard command line tools for your VCS.
As a single file program installation is simply copying nitpick.py into a directory in your path and ensuring that the file is executable. An optional, but recommended, step is to rename the file nitpick, with no extension. All the commands in this manual will be written assuming you have named the Nitpick file "nitpick", but any name you desire will work.
Once Nitpick has been copied into place you are ready to start using it. No additional configuration is necessary.
Unless you already have a project which has a Nitpick repository created for it you will have to create a new Nitpick repository. To do so you simply need to open a shell and go to the root of your project in source control. Once there you need only run the command nitpick init --vcs vcs. This command will create a new Nitpick repository in the current directory under the hidden directory .nitpick. It will automatically initialize a default, empty repository and attempt to commit it to the VCS.
vcs must be chosen from the supported list of VCSes. Currently git, hg, svn and file are supported. The first three are well known VCSes. The file VCS is a null VCS which creates an unversioned Nitpick repository. This can be useful if you want to play around or try Nitpick with an unsupported VCS, though the file VCS doesn't support committing and reverting as the other VCS options do.
If you use the Mercurial, hg, VCS option there is one additional step. In the project root you should see that the .hgignore file has been created/modified. You should review this file to ensure that it is acceptable. Nitpick has a few administrative files within its repository which must not be committed to the VCS and Nitpick will automatically add these files to the ignore list of the VCS. Since Mercurial requires modifying a user file it will not commit the ignore list automatically.
Though there is a command line interface to Nitpick, it is not the preferred interface and exists primarily for scripts and power users. The preferred interface is the Web Interface. A static dump of the local web interface is available to be viewed on the web. As this is a static dump certain features do not work, such as filtering or changing the fields shown in the index.
The Web Interface uses an embedded web server to serve pages to your local browser in order to create a familiar interface. Nitpick will attempt to cause your local browser to open a new tab or window to the Nitpick Web Interface. If contacting a graphical browser fails it will attempt to find and start one of the standard terminal browsers instead. Failing that Nitpick will notify you of the address where you can view the Web Interface.
Starting the Nitpick Web Interface is as easy as running the command nitpick web inside your project. Nitpick will automatically search the parent and grandparents, etc. of the current directory to search for a Nitpick repository.
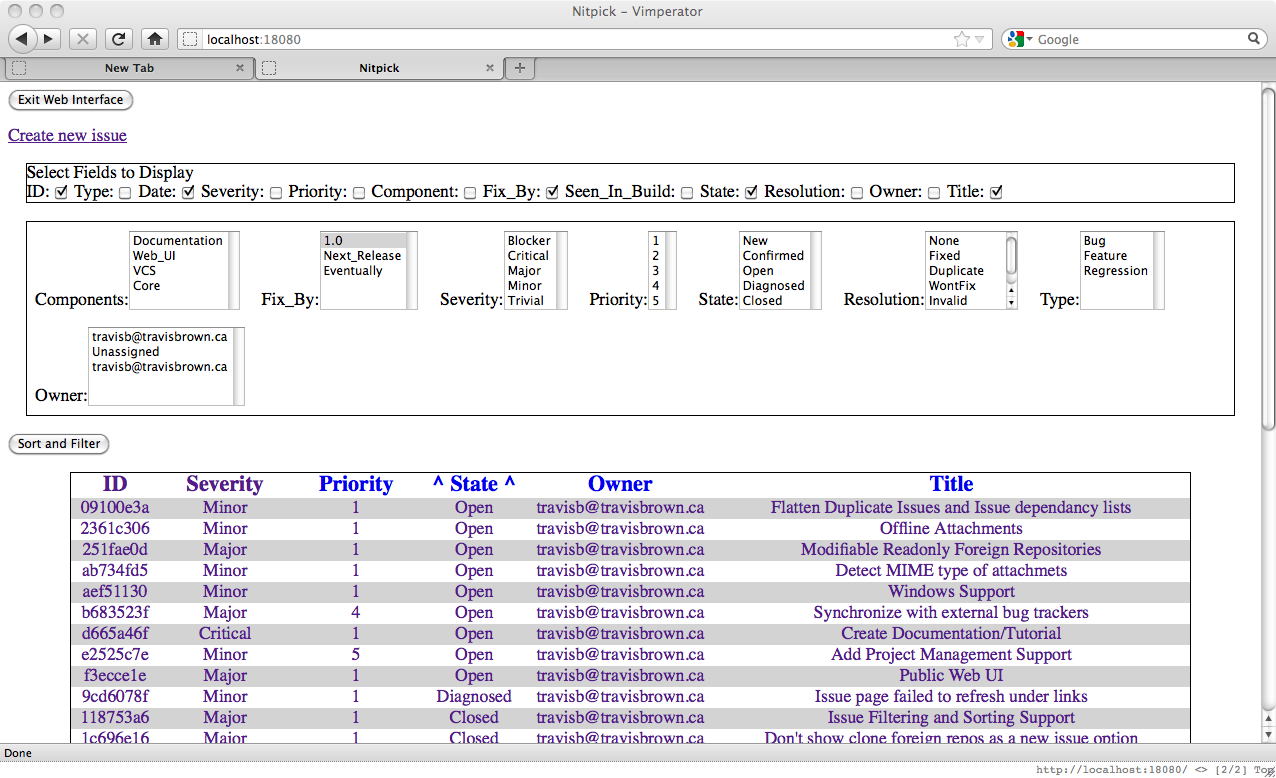
Starting the Web Interface on a repository will bring up the issue list, which will look something like:
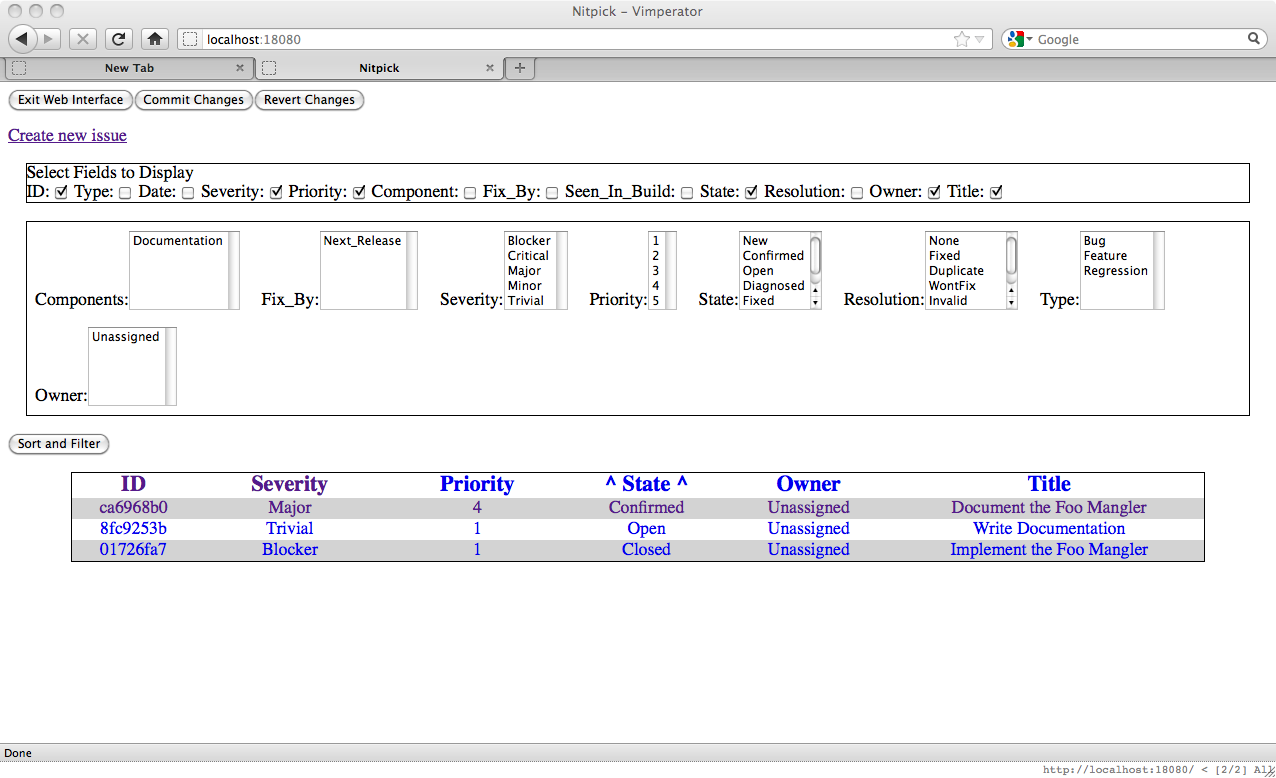
This is the first page you see when starting the web interface and it is simply a list of sorting and filtering options, which are dealt with later, and the list of issues in the repository.
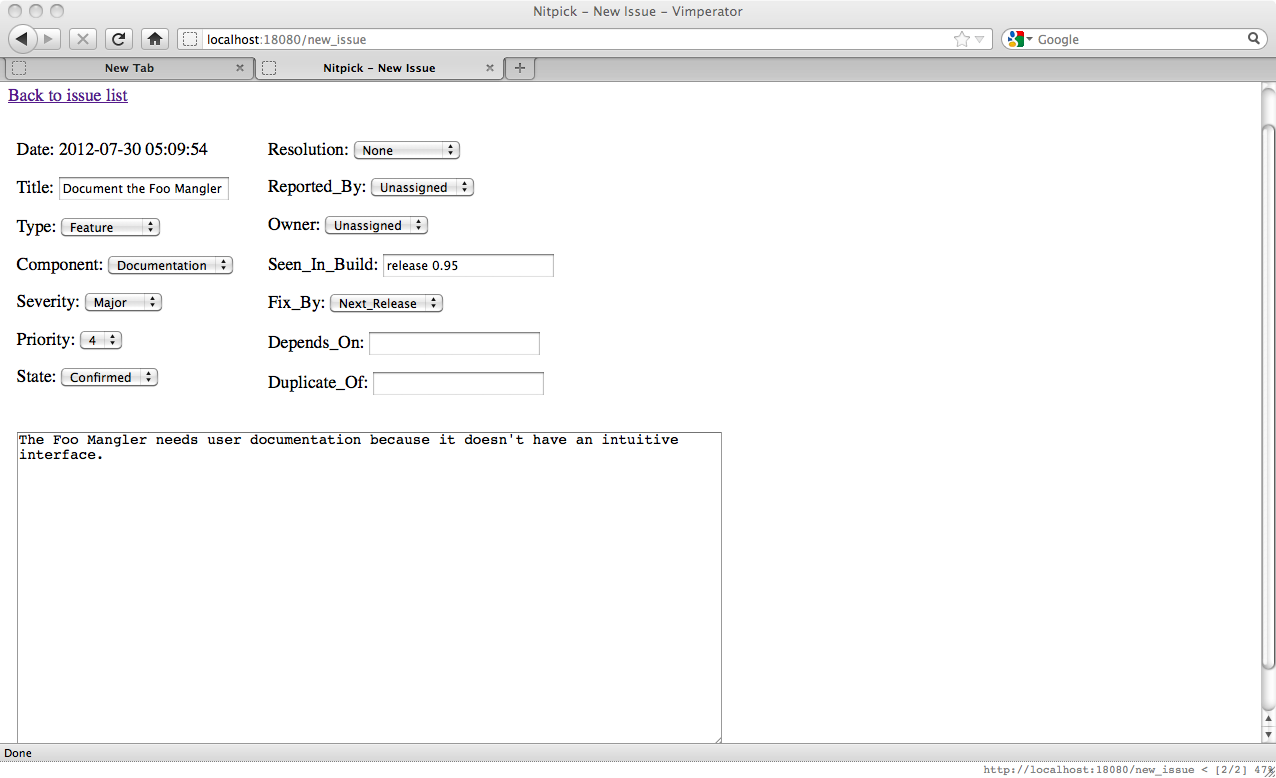
As you can see this is a new Nitpick repository and doesn't have any issues in it. We create an issue by clicking the "Create new issue" link near the top of the page. Clicking that link brings up the following page where we can fill in the fields for the new issue:

There are several fields which are required or available when creating an issue. Date is automatically filled in with the UTC date and time as of when you clicked the New Issue link. In Title you should enter a short, but informative title for the issue. Type is the type of the issue, the default value is chosen from the configuration value, but you can select from the configured options here. Similarly there is Component, Severity, Priority, Fix_By, State and Resolution. Resolution is usually kept on the default until the issue is solved.
The Reported_By and Owner fields are a bit different. These fields are set to the username of the issue reporter and the current person the issue is assigned to respectively. The valid usernames must be configured in the Nitpick configuration and if Nitpick is able to determine your username from the configured list (by matching against your login name for example) then that suggestion will be selected by default. It is important to note that you cannot change the Reported_By field using the web interface after the issue has been created.
Then we have three free form fields, Seen_In_Build, Depends_On and Duplicate_Of. Seen_In_Build is meant to contain a short description of when the problem was first seen, such as the first version of the software the issue occurs in. Depends_On and Duplicate_Of are usually left empty when creating a new issue, but are made available should you have that information at creation time.
Finally there is a large textbox where the long form description of the issue can be put. We'll set the various metadata fields and comment as shown in this image and then submit the new issue.
Submitting this issue will bring us to the following page:
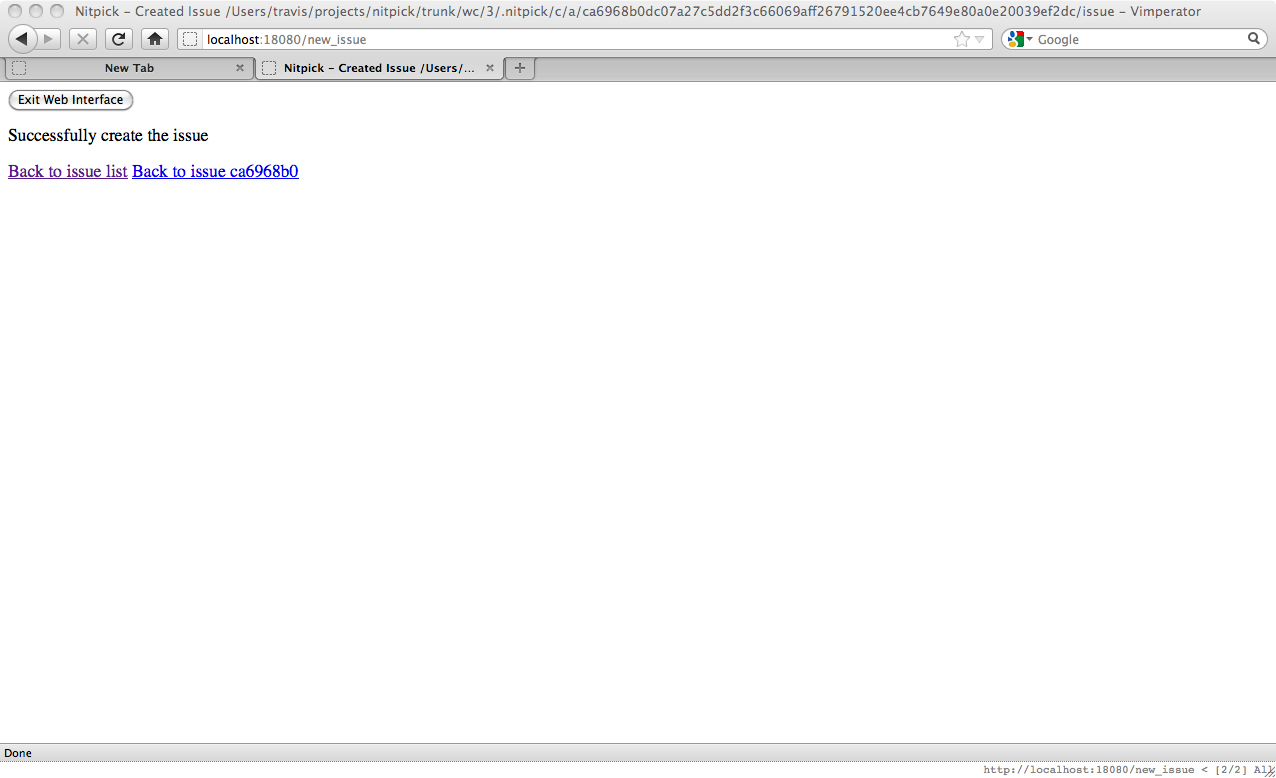
From this page you can either go directly to the issue, or back to the issue list. The issue list will show something similar to:

We can easily see that we now have one issue. Going to this issue page is as easy as clicking on any link in the line for that issue. Doing so will bring us to the issue page:
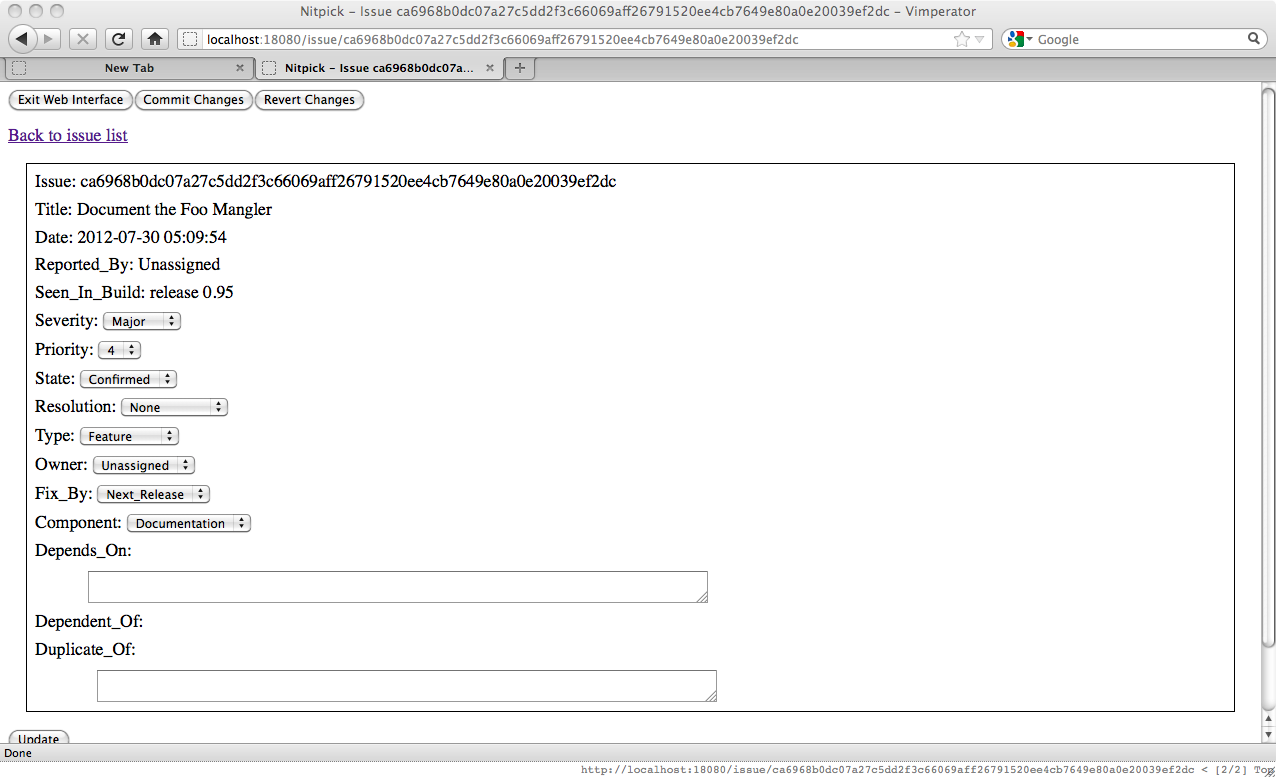
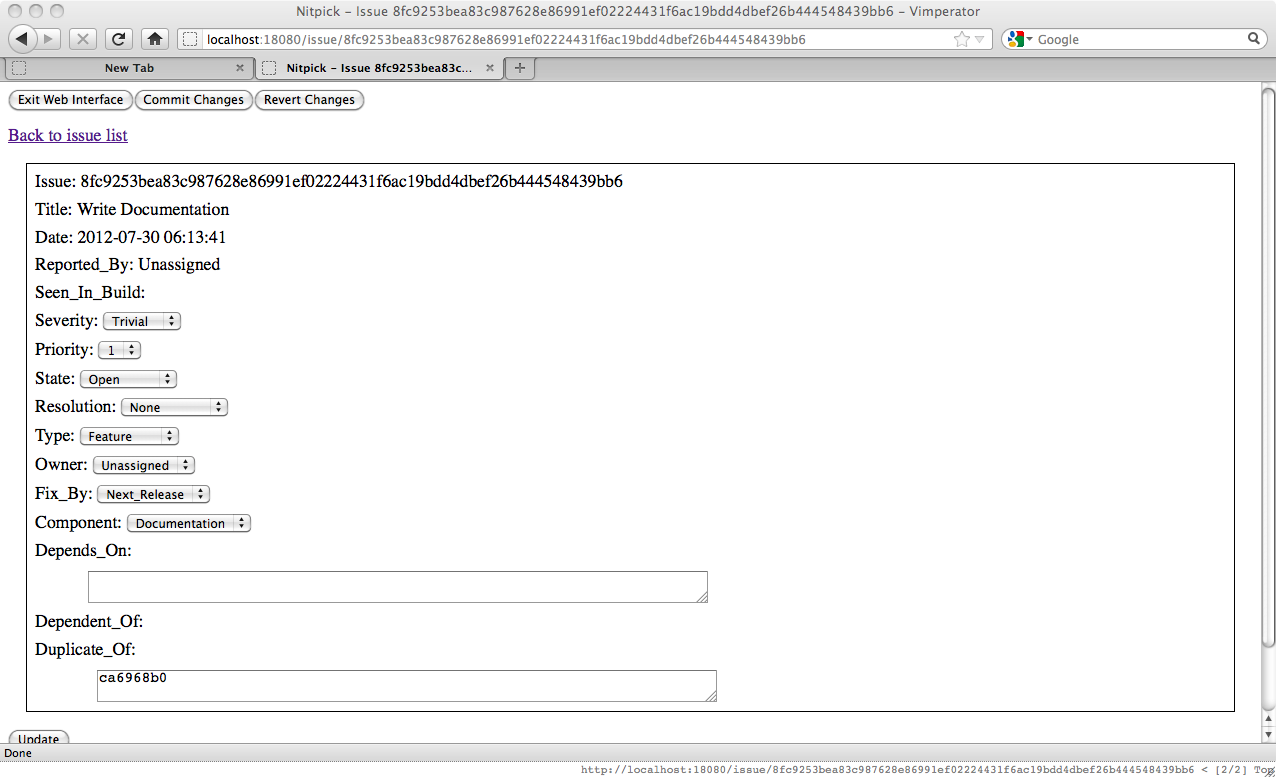
At the top of the issue page we see all the metadata about an issue. Most of it is the same from when creating the issue, but we also have the full issue identifying hash. This is useful for putting into the Depends_On or Duplicate_Of fields or in a comment when referring to the issue. To update the issue you should make the metadata modification you want and then click the "Update" button.
Below the metadata are the issue description and comments. While you can't edit the issue description, you can add comments whenever necessary by clicking the "Add Comment" button. Doing so will open the new comment page, like so:
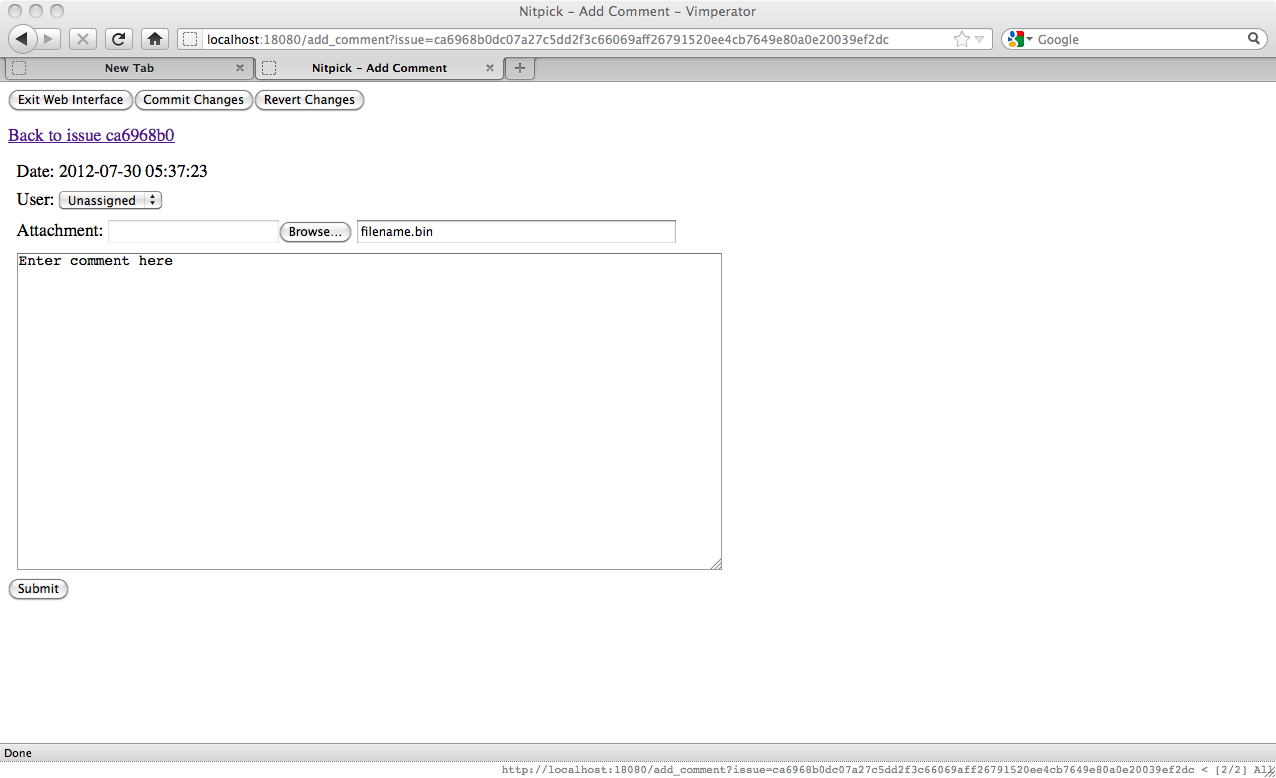
There are a few fields here which must be filled in. As with the Reported_By field previously mentioned the User field will suggest the current user if Nitpick can determine a match from the repository configuration. The two attachment fields will be left for later. That merely leaves the actual comment itself. Filling the comment in and submitting will bring us back to the page where we can choose to go back to the issue or to the list of issues. Going back to the issue we can see our comment is there:

Nitpick supports threaded comments if you use the per-comment "Reply" comment. Doing so is recommended as it makes it easier to follow the discussion.
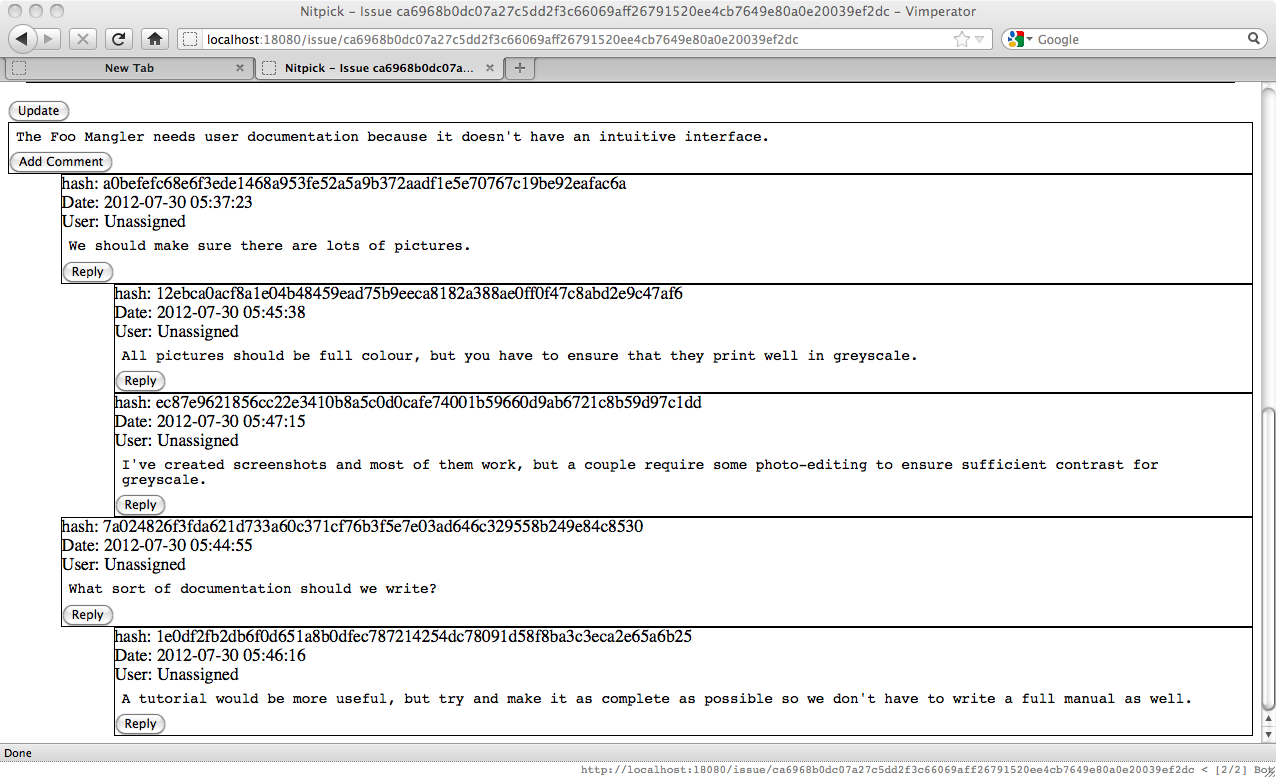
Finally, putting an URL or issue hash in a comment will result in a link to that URL/issue.
You may have noticed that after we created the issue some new buttons were created at the top of each page beside the "Exit Web Interface" button.
These new buttons, "Commit Changes" and "Revert Changes", are part of Nitpick's integration with your project VCS. Creating or modifying issues doesn't commit those changes to you VCS until you press the "Commit Changes" button. This let's you combine multiple Nitpick actions, such as commenting on multiple issues, into a single commit to you VCS, reducing clutter in your history. It also gives you the option to throw away any Nitpick changes you've made using the "Revert Changes" button.
Those two buttons will restrict themselves to only the modified Nitpick data and will not touch other files which have been modified in your working copy or checkout. It is possible to commit changes to issues alongside the corresponding code by including the modified Nitpick files when doing a normal commit using your VCS. This is useful for keeping the code which fixes an issue and the marking of that issue as complete together.
The VCS buttons only appear when using a real VCS (as opposed to the file VCS option when creating the repository) and Nitpick believes that you have made changes.
Nitpick supports including an attachment alongside any comment for an issue. This lets you keep important debugging or design information alongside the issue under discussion.
To add an attachment, when creating a comment simply select the file to attach. By default Nitpick will use the filename provided by your web browser for the file, usually the filename on disk. You can provide a different filename by changing the filename in the field from "filename.bin" to whatever name you wish to use.

Submitting this comment with attachment will result in a new attachment which has a link to the attachment.

Marking an issue as a duplicate of another is useful when you have several issues reported and it is later determined that several issues are identical. In this case it can be useful to maintain this information in an easily navigable form. For this we have the Duplicate_Of field.
This field is a space separated list of issue hashes which are a duplicate of this issue. Duplicate issue markings are commutative. That is, if issue A is marked as a duplicate of issue B and issue B is marked as a duplicate of issue C, issue A is also a duplicate of issue C. Currently a limited set of cases similar to this are traversed by Nitpick to produce the linked list of duplicate issues.
To see this in action let us create two more issues
Obviously issue 8fc9253b is a duplicate of ca6968b0. If we go to the issue page for 8fc9253b and enter a unique substring of the issue hash, like so:
When we update the issue with the "Update" button we'll see that the issue hash is completed and there is a new link to the issue the current issue is a duplicate of.
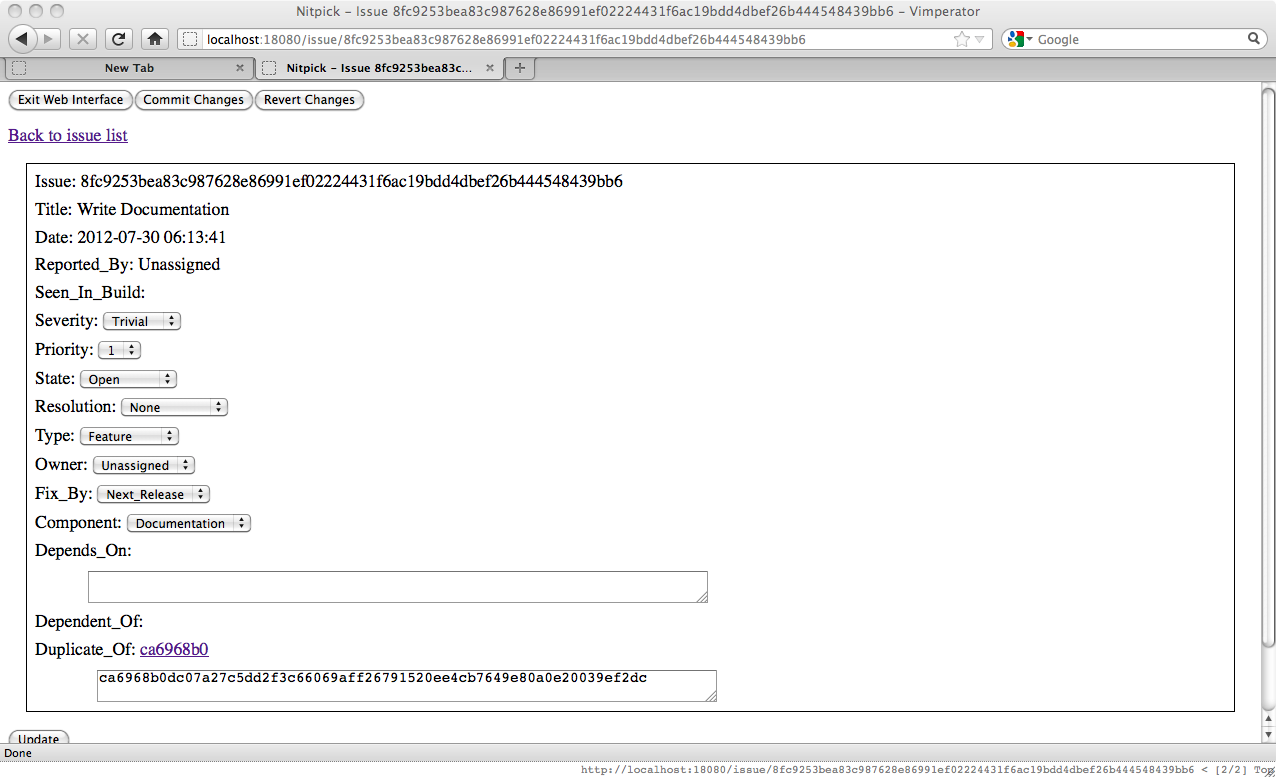
Because this issue is a duplicate of the other issue we see that other issue's hash in the Duplicate_Of field. On the other issue we will see a link back to this issue, but not the full hash in the Duplicate_Of field because this issue hasn't been marked explicitly as a duplicate of the first issue.
Recalling our list of issues, we will next see how to mark issues as dependent on one another and how this can be useful to track down what still needs to be done.
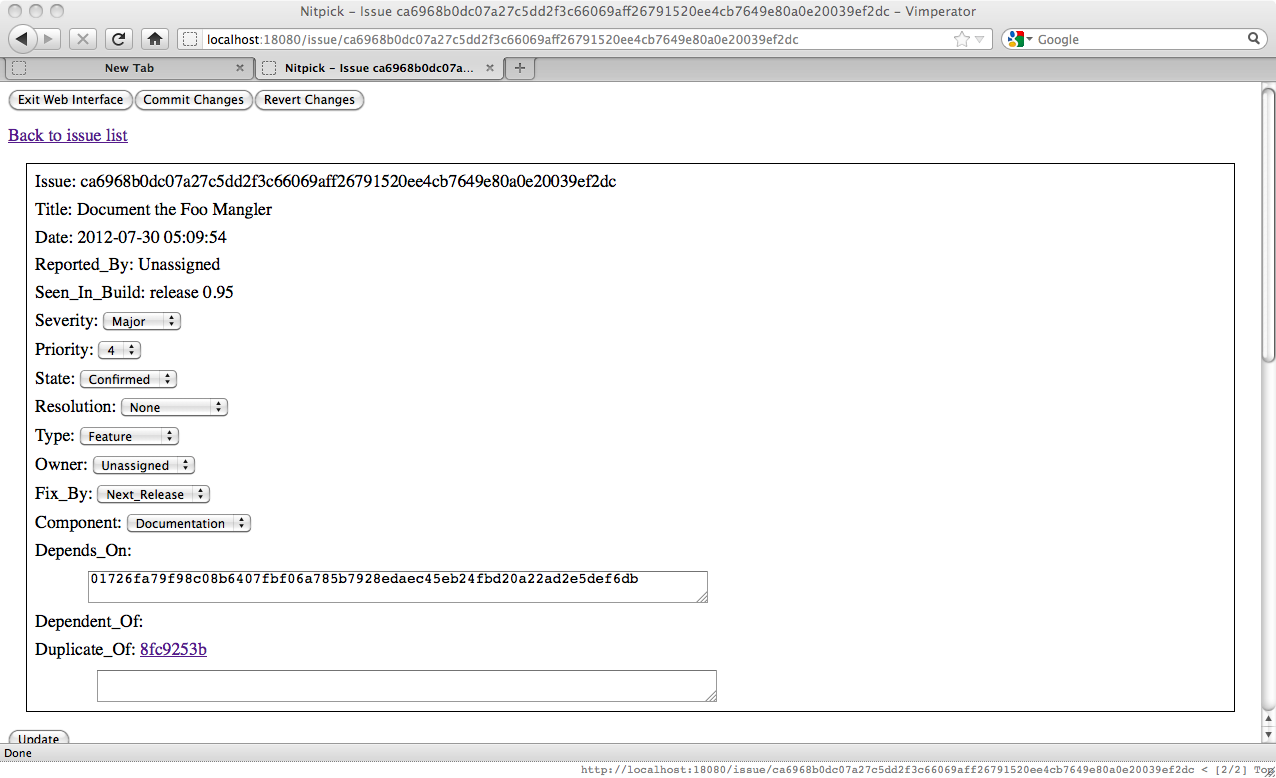
Looking at our issues we see that we have one to implement the Foo Mangler. You can't complete the documentation for the Foo Mangler until it is completed itself, so it would be useful to mark that issue as a dependency of the documentation effort. This is done similarly to marking an issue as a duplicate, but in the Depends_On field instead.
Updating the issue will then show a link to the issue the documentation depends upon.
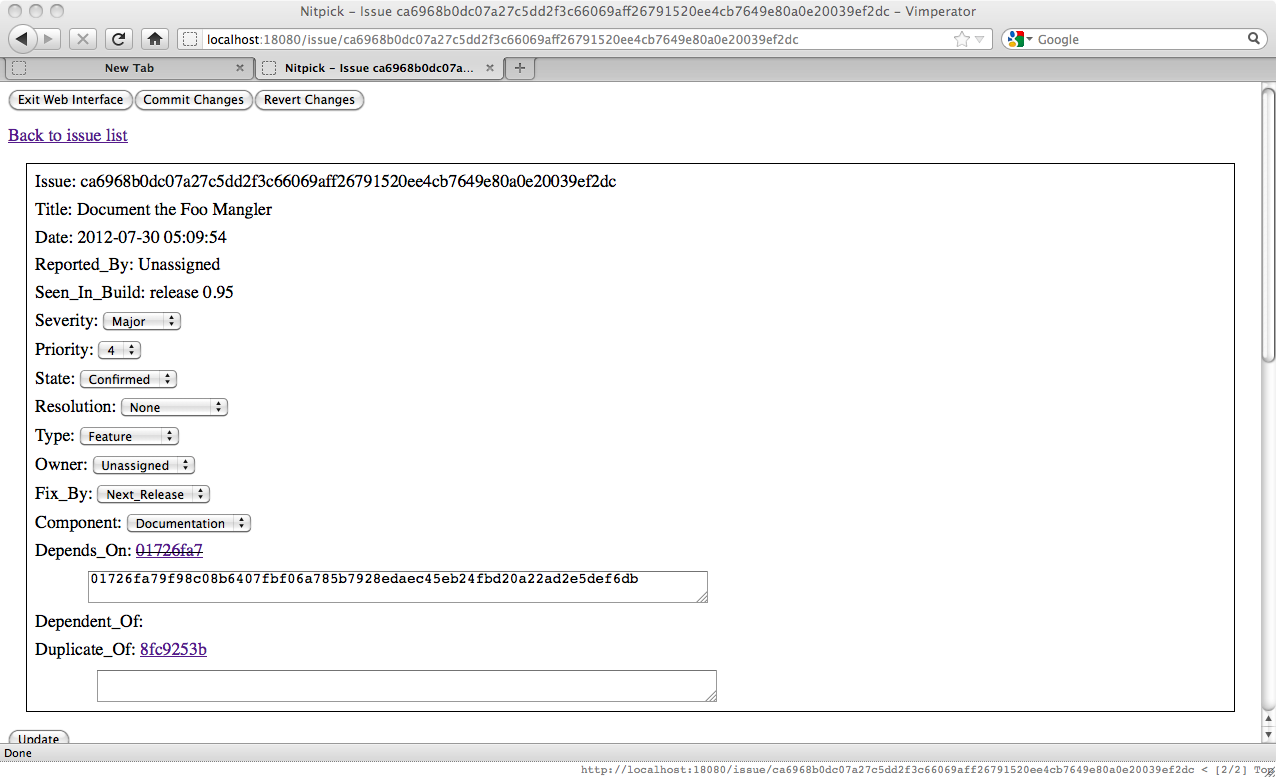
You'll note that the issue this issue depends on is now a link and further that it is a struck-through link. This is because that issue is 'Closed' (actually in the last configured state). If we go and look at that issue we will see that it has a dependent issue. Since dependency is a directional relationship it is only possible to add dependencies to the higher level issues.

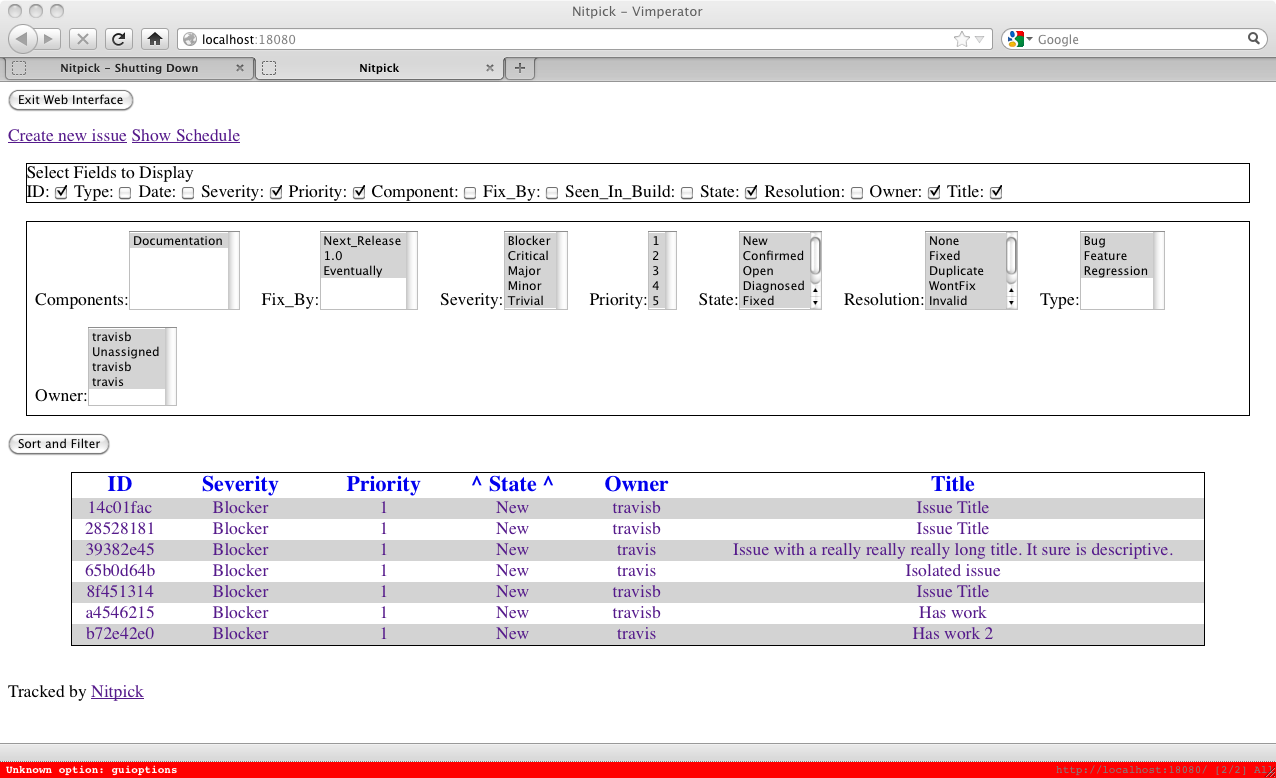
If we look back at the issue list we would see a number of filtering and display options at the top of the page as well as sorting options in the table header. These are useful to search through the issues to find one which matches your criteria. For example, if we wanted to find all the issues which are marked to be fixed for Release 1.0 which were created around a certain time we could setup the filtering as such:
Using the "Sort and Filter" button will submit these options and change the fields shown and only issues which are Bugs will be shown.
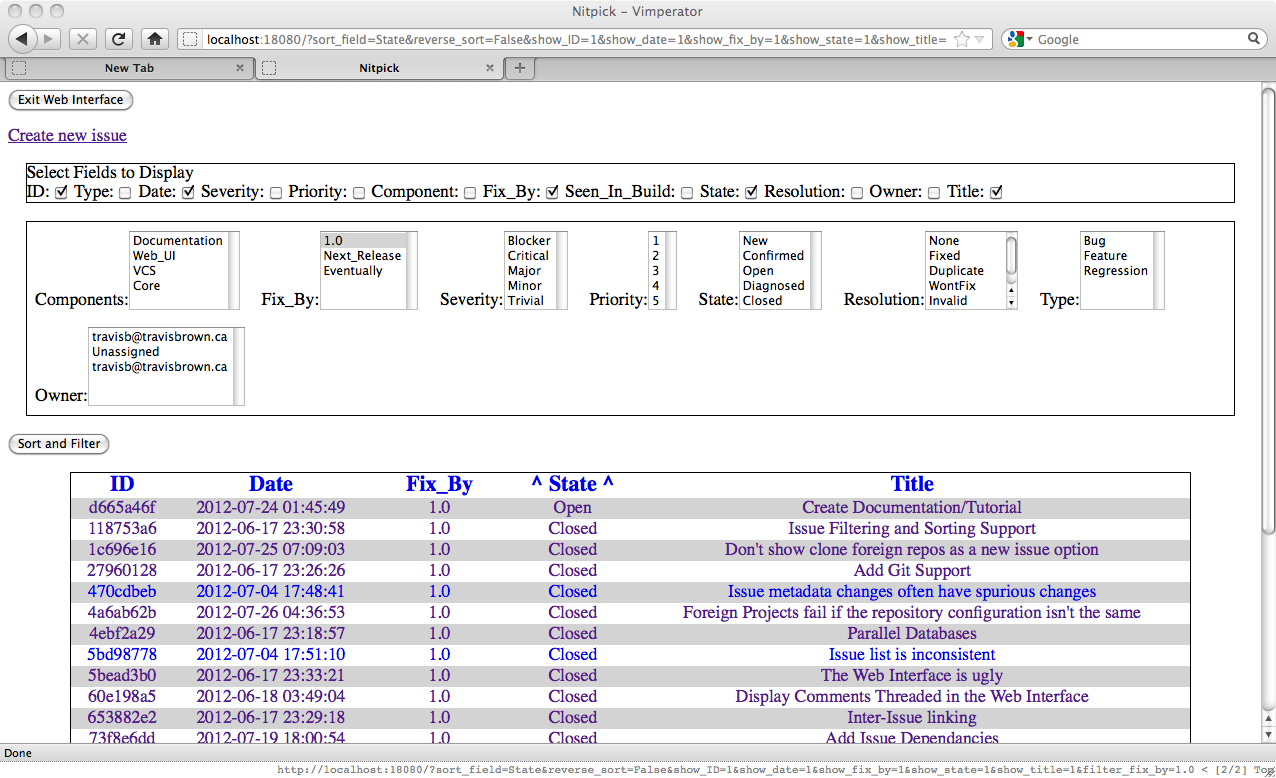
This has filtered the issues, but that isn't sufficient. In order for us to find issues created around the correct time we need to sort on Date. We do that simply by clicking on the Date header in the table. There are three sort options for each column: neutral, ascending and descending. Only one column may be sorted on at a time. Let us click the Date header once to sort it ascending.

With this sorting it would be easy for us to find the date range we are looking for. Clicking the header multiple times will cycle through the sorting choices. Saving a filter and sort pattern is as easy as getting the settings correct and then creating a bookmark using your browser.
Distributed bug tracking is not yet a commonly used technique and as such all the use cases may not be immediately obvious. This section intends to lay out some of the ways distributed bug tracking in general and Nitpick in particular can be used. Hopefully these generic use cases will help you use distributed bug tracking in the most advantageous manner possible for your particular needs.
Of course the most basic way to use distributed bug tracking is as a basic bug tracker. In this scenario you simply configure the bug tracker as part of your project source control system.
This simple use case brings several advantages over traditional centralized bug tracking. These include:
While it is useful to have the bug database sit beside the source at the project level, see the next section, it is possible to have the equivalent semantics of a centralized bug database with the advantages of a distributed system. To do so you would simply create the bug database at a higher level in the VCS, or in a separate repository specifically for bugs.
Where distributed bug tracking really shines is when it comes time to branch. One of the most frustrating difficulties with branching is determining which changes are in which branch. If you have a long lived feature branch traditional bug trackers make it difficult to determine which bugs have been fixed in the branch by merging in changes from the mainline. This is caused by the fact that it is cumbersome to maintain the information on which branch work has been done in and which branches have picked up said fix.
In some forms of distributed bug tracking, including the style Nitpick encourages, the bug database sits alongside your code and when you branch your code you also branch the bug database. This makes it easy to keep track of which branches have which bugs fixed, since when the fix is merged into a branch it is easy to also merge the bug database updates. In fact, it is recommended to ensure that the fix and bug update are done in the same VCS commit.
Configuring this setup is easy. All you have to do is create the Nitpick repository in the root of your project checkout. Then the normal branching and merging operations of your VCS will take care of the heavy lifting. The Nitpick repository format has been specifically designed to be easy to automatically merge in most cases and when automatic merging isn't possible to have an obvious and easy to read diff.
If your VCS supports adding a view from one branch into another, such as using SVN externals, then there is even more you can do. One disadvantage of having the bug database branch with the code is that a bug may be reported on the trunk when it also effects a branch. If a developer then works on that branch they wouldn't be aware of new bugs added to the trunk, or new bug information. The latter case could happen if you have a bugfix branch for a particular bug and some reporter who doesn't know about this bugfix branch, perhaps because it's a local branch. In such a case it is useful to have the branch see the updates to the bug database in the trunk without having to continually bring in changes from the trunk.
If your VCS has sufficient support or you are willing to lay your development environment out in a consistent manner, say by mandating that ~/workspace/mainline always contains a recent checkout of the main branch, then you can use the Foreign Projects feature of Nitpick to have Nitpick combine both the bug database of the branch and the bug database of the trunk. Thus you'll get the best of both worlds, a bug tracker which carries the bug state along with any code which fixes a bug and the ability to comment on a bug in either the branch or the trunk and have it visible to the interested parties.
The Foreign Projects feature used above allows combining multiple versions of the same bug database into one view. We can take this further and have a bug database with the primary purpose of combining several bug databases in order to have a single unified view.
Such a setup can be useful in a situation where you have multiple logically distinct codebases, perhaps several libraries and a few applications. Each of these projects should follow their own branching and release schedules and likely live within their own repositories. In order to have all the advantages of distributed bug tracking for each project you need a bug database with the code of that project. However, this would make it difficult to get a view of all the bugs for a team or company as an example. This is where the meta bug tracker comes in handy.
With each project having their own bug database you create one additional bug database which uses all those individual databases as Foreign Projects. Then you not only have one central place where you can view and modify the bugs across many projects, but you maintain all the advantages of per project databases. It is even possible to have many such meta databases, each with a different set of projects they follow. Thus a team manager may have a personal meta database which combines the bugs from all projects, but a frontend developer may have one with only the projects they have the expertise to modify.
Nitpick has sophisticated support for this arrangement, but there is one aspect of configuration to keep in mind. Though Nitpick will present a combined list of bug states, priorities and milestones it gets confusing quite quickly if every project has a different list of bug states with overlapping meaning. It is therefore recommended that, as much as possible, all the foreign project bug databases have the same sets of allowable metadata states. That is, every project has the same set of possible bug states or possible priorities.
This final use case is not directly related to distributed bug tracking at all, but instead takes advantage of one particular aspect of distributed bug tracking in combination with the Nitpick scheduler. Briefly, because distributed bug tracking makes it easy to modify many bugs privately and then commit (publish) those changes all at once it is easy for a manager to examine the effects of different bug or task assignments on the predicted schedule.
Consider a project with several dozen bugs over many components with ten developers of differing skill levels and specialties. For any particular bug there could be several developers capable of working on that task, but not every developer. It is therefore difficult to automate the way tasks are handed out. Instead a human can look at the schedule, as predicted given the current state and dependencies of all the tasks in the bug tracker, and use their own judgement to shuffle task assignments around based on developer preference and ability. Once this person has finished working on the assignments they can commit all their changes at once, or throw all their changes out if they are unsatisfactory.
In much the same way that version control improves the ability of a developer to write code, version control improves the ability of managers to come up with a good schedule.
What has been described above are the basic necessities of Nitpick usage. Nitpick has a few more advanced features for those willing to do a bit of leg work.
When a new Nitpick repository is created some reasonable defaults will be put in place. It is possible to modify these settings to fit the needs of the project better. As with all the issues and comments the configuration is made within the VCS and follows the repository wherever it should go.
Most of the configuration knobs are lists of options for one field or another. When this is the case the first element of the configured list is the default selection. Nitpick makes no demands upon the lifecycle of an issue so option can, for the most part, be configured in any order and with any name.
The most useful configuration is to fill out the user list. This list is contained in the .nitpick/config/users file. The format is one user per line. The recommended format is at least an email address, though the actual format is freeform.
One feature to keep in mind when filling this list in is that Nitpick will make an attempt to suggest a better default user from this file for the current user. It does this by finding the current user account as substring of one of the configured users. Therefore if my user account is travisb and the user list contains the value "Travis Brown (travisb)" and no other user which may make the match ambiguous then Nitpick will select this user by default for fields where the current user is appropriate. Such fields include the Reporter of new issues and the user when creating comments.
If the Nitpick matching doesn't work due to ambiguous user matches or an account name which doesn't match the user list (this could happen if my account username was funnybunny, but it's my business email address which is in the user list) then you can set the NITPICK_USERNAME environment variable to use that user. Note that no matching into the user list will occur if you use this setting.
Additionally, if you are using the scheduling feature, then you will find it useful configure the number of units of work a developer does per day of the week. For more information see here.
For issues Nitpick has a number of selectable metadata states. These are for things like the issue component or target release, etc. These are all modifiable by modifying the .nitpick/config/config file. The format of each line is the list name, followed by a colon, followed by a space and then followed by a space separated list of options. The first option will be taken as the default when creating new issues.
The state options are have a special case in that not only is the first option in the list the default when creating new issues, but the last one in the list is considered 'closed' by Nitpick. A closed issue will have any links to it shown as struck out to show that the issue is closed.
With the above in mind it is recommended that the final state be Closed or some project equivalent. It is further recommended that the first fix_by be either the next release, or some triage release so new issues are kept at the forefront.
If you are using the scheduling feature please see here for additional project configuration related to that feature.
Nitpick is designed to store the issues within the same repository as the source code. This may leave you wondering how you can let others who don't normally use your source code have access to your issue repository. While Nitpick doesn't currently have a read-write public web interface, it does have a readonly web interface which still lets users view all the issues. They can even sort and filter on the issue list to help them find the issues they are concerned about.
This is done by passing the --readonly option to Nitpick when starting the web UI. This modifies the UI to be in readonly mode and is suitable for any website mirroring tool, such as wget, to mirror into a readonly copy you can upload for public consumption. Note, however, that the readonly mode only allows issue list filtering and column filtering if used in a browser which supports javascript.
As a distributed issue tracker a Nitpick repository is contained beside the source code in the project VCS. Though this model presents several advantages related to issue states and comments following the code through branches, it also presents difficulties in viewing issues across branches or between several projects spread across multiple VCS repositories.
Nitpick solves this problem through Foreign Projects. A Foreign Project is another Nitpick repository, usually a root Nitpick repository of another project or branch, from which Nitpick will present a combined view of the issues and comments from all the projects. It is possible to change the state of or comment on issues in these Foreign Projects.
When Foreign Projects are configured there is an additional possible filtering column, Project. The project of an issue will also be displayed on the issue page.
Configuring Foreign Projects is relatively simple. First you must create the directory .nitpick/foreign. Inside this directory you must create links of some sort to the foreign Nitpick repository. The name of the link will be the name of the project when viewed inside the Nitpick Web Interface.
Any method of linking repositories which is functionally equivalent to a symlink or directory should work. Support for the version control functionality working inside Foreign projects varies with the capabilities of your VCS and Nitpick's support. For example, Subversion externals are fully supported where nested git repositories are not.
One common use case for Foreign Projects is to combine issues and comments across the current branch with those found on the project trunk. Such a setup is especially useful between a release branch and the project trunk. In this situation the Foreign Project is a branch of the local Nitpick repository. Issues will be combined across them and it is possible to create issues in either the local repository or any of the foreign repositories. Comments will be created in an appropriate repository.
If using Subversion externals to create the link you must watch out for infinite recursion when creating a link back to the current branch, such as if you wanted to create a Foreign project to the trunk in the trunk so all branches would automatically get the trunk as a Foreign project. The easiest way to avoid this is to setup the svn:external property on the root of your trunk/branch like so ^/trunk/.nitpick .nitpick/foreign/Trunk. This example would create a Foreign Project to the trunk issue repository. When working on the trunk you won't see a Foreign Project field because all the issues are in the local repository. However, when you go to branch the trunk, the Foreign Project (trunk) will diverge and you will see the different project options.
Configuring Foreign Projects across several different projects works quite similar to configuring across branches. The only major different is that Nitpick will combine all the configurations of the various repositories. That is, the set of all possible issue states from all repositories will be used when filtering or creating issues. It is recommended all projects have the same configuration. If this is not then case then it is up to the user to ensure that a valid component, state or other issue metadata is chosen for the particular project.
Nitpick has optional support to use the standard issue information along with some new information to produce an approximate schedule. This schedule provides a view into the timeline of the project with respect to issue balancing and the like.
The scheduling feature of Nitpick is an optional feature which is disabled by default. To enable it you must change the value of schedule in the .nitpick/config/config file from False to True.
Once you have enabled scheduling support in Nitpick you need to provide some information. The first of this is optional per developer indications of how much work they do on each day of a week on average. The way you do this is to append a string like ' (8,8,8,8,8,0,0)' to the line of the particular user. This particular configuration states that whichever user produces eight units Monday, Tuesday, Wednesday, Thursday and Friday and then doesn't work Saturdays or Sundays. If no work unit production values are configured then a default of zero units for every day of the week is used. A full example of a line could be "travisb (8,8,8,8,8,0,0)".
The units of work are unitless. Two suggested ways to use this feature are to either consider these units to be hours of work or complexity units from something like Planning Poker. It is important that, whether you consider these units to be hours or complexity units or something else, you must keep this interpretation consistent across the developer configuration and the task estimates.
It is not necessary that every user in the configuration have a production configuration. Any user which doesn't have such a configuration will have a default configuration which will be used. This configuration will result in any task assigned to them taking several years.
The Fix_By milestones of the project can also have a date associated with them. This is in the format of '{yyyy-mm-dd}' after the Fix_By name, eg. '1.0{2012-11-03}'. This date is optional, but having it will help the algorithm to schedule tasks for an earlier milestone as early as necessary.
Accurate scheduling of a software project requires quite complete information on the various tasks, their estimates, completion status and dependencies. Many project scheduling systems require a project manager to glean these bits of information and manually enter them into a separate system. However, most of this information is already available in a bug tracker. Nitpick takes advantage of this fact to provide a simple scheduling tool. Once you have enabled and configured the scheduling feature as above you can reach the schedule through the Show Schedule link from the issue list.
Upon clicking that link you will be shown the computed schedule. This schedule has several features. The first is that every task is coloured according to its milestone. If the milestone due date appears in the list of dates on the side then it will be coloured to match all its associated tasks. Gaps in the schedule are colours a teal colour, as can be seen by the right bottom-most task. Every column is a user with assigned tasks and every issue title is a link to issue itself.
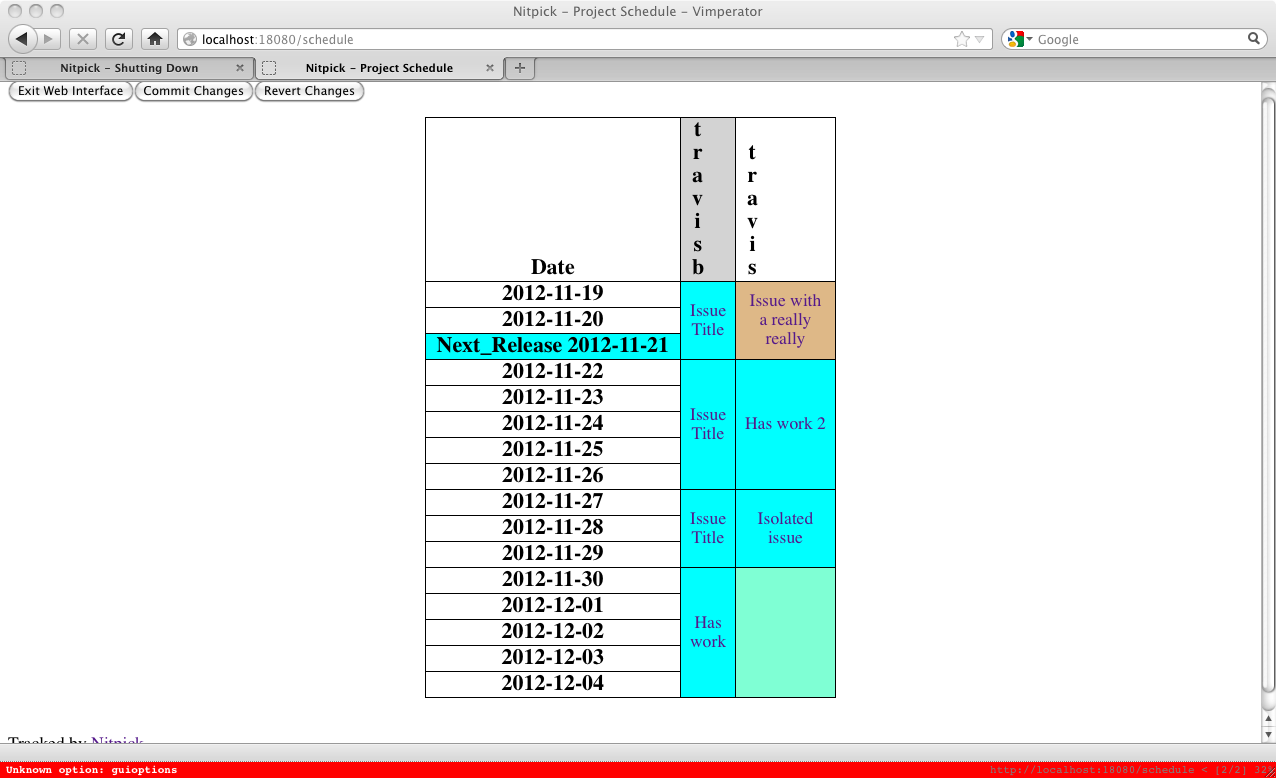
The schedule is always computed starting from today. Nitpick won't lie to you about you being able to make your milestone deadlines. This can be seen in the schedule above, even though the Next_Release milestone is has a deadline of November 21st, 2012 the tasks associated with that milestone carry on until December 4th. This may be due to incomplete information, such as any partial completion status having not been entered, or the assignment of tasks may not be optimal. Of course, you could just have too many things to do and not enough people to do them.
The Nitpick scheduling algorithm provides a good schedule, but not an optimal schedule and it doesn't reassign issues to improve the schedule. Issue reassignment must be done manually. If you have many large tasks then frequently updating the completion status is necessary to get accurate schedules.

Updating the completion status is as simple as entering the estimated completion into the Percent_Complete field. This is a value between 0 and 100. If you don't keep this data up to date then an issue will be considered unstarted until the task is closed. It is not necessary to change the completion status to 100, closing the issue is equivalent.
One advantage of using the bug tracker data to produce a schedule is that you have all the issues and most of the dependencies already in the database. Nitpick takes all this into account when producing the schedule, so it is important to have work estimates for all bugs and any dependencies which are known. If you look at the schedule and notice a missing dependency you should add it as appropriate and then look at the recomputed schedule.
One final word on the limitations of scheduling within Nitpick. The algorithm doesn't allow fixed date dependencies, such as you would find if a third party had to deliver some library fix before work can continue. It also doesn't take currently take priorities into account when scheduling. It assumes that every task in the system must be scheduled and it attempts to schedule all tasks as early as possible without unnecessarily extending the schedule. As stated above this algorithm is approximate and shouldn't be taken as gospel. Additionally, the algorithm works best when the developers work on approximately the same days of the week, though it will take into account when it doesn't work out that way. The algorithm is also optimized for multi-day length tasks and rounds all work up to the nearest day. Thus the schedule will be the most accurate when the majority of tasks require at least one day of work.